Measure.exe for DrDAQ
DrDAQ is a device of Pico Technology to be connected to a PC via USB for measurements of voltages, resistance, pH values, light brightness, sound and temperature. The software that comes with this device is able to measure, but not to store big amounts of data.
Measure.exe is a program to measure data, do an analysis during the measurement (with alarm function) and store the results with high velocity. Measure.exe does not (yet) support the output channels of the device. Below you will find a more detailed description of the program, which is a copy of the manual.
Download
measure.zip (© see below, note that is dangerous to use
programs of others!)
Sample measurement result:
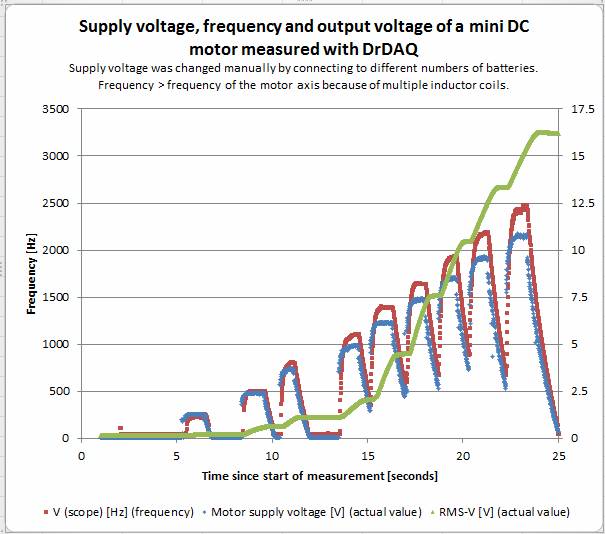
Table of contents
Installation
Package content
The zip
file contains:
|
Measure_XP.exe |
Program
to measure with DrDAQ for Windows XP (and probably all later Windows
versions) |
|
Measure.exe |
Program
to measure with DrDAQ for Windows 8 (and probably Vista and Windows 7, but
NOT for XP) |
|
CheckRD.exe |
Program
to analyze raw data |
|
Measure_scope.mcf |
Sample
configuration file to measure AC voltage with high sample rate (10 kSamples
per second) and save important results to file |
|
Measure_Temperature.mcf |
Sample
configuration file to measure and save Temperature data for a long period |
|
Measure_light_frequency.mcf |
Sample
configuration file to measure light brightness with high sample rate (10
kSamples per second), calculate frequency without saving data. This may
be a good sample to start with, as you do not need any settings. |
|
Measure_cfg_file_format.mcf |
Explains
the format and entries of the configuration files. |
|
Measure_en.doc |
English
manual |
|
|
|
Note: the
.mcf (measure configuration) files are
pure text files.
Measure.exe
The program
measure.exe is written with the Microsoft Visual C++ version 6.0 running under
Windows XP. It uses the MFC which is linked statically to the program. Therefore,
the only DLL, that is required, is UsbDrDaq.dll. This is installed when you
install the software of picotech for DrDAQ. Measure.exe was developed with version
1.0.0.93 of this DLL.
There is
another version of measure.exe, compiled with Visual Studio 2012. This version
should run on Windows 7 and Windows 8, maybe on Vista, too. You can distinguish
the programs after opening the About-dialog, that shows the compiler version.
The main difference is, that the XP-version does not support file sizes larger
than 2 GB.
Run the program
To run
measure.exe, just copy it to any directory and start it. If you start it
without any parameter, the program will try to connect to the DrDAQ (actually,
only 1 device is supported) and display the result in the top line of the
window. If DrDAQ Status equals 0, the program is ready to run. Else you should
find the error, which may be one of the following incomplete list:
1.
UsbDrDaq.dll
is missing (or not found, as it is in a wrong directory).
2.
Another
program uses the device.
3.
measure.exe
was not closed completely. (This may happen, if the program crashes, or if you
quit the program before stopping the measurement.) Look for measure.exe using
the Task Manager and kill all running instances of measure.exe before starting
a new one.
4.
If
the steps above do not work, repeat it and unplug the device from the USB port.
Then connect it again and run the program.
If DrDAQ was connected successfully, you may
click Get all channels to read all
input channels of the device (see below).
If you find
the program useful, you may use an predefined or self created configuration
file as the first (and only) command line parameter to run the program with
your desired settings (see below).
Quit the program
Clicking
the button OK quits the program is no
measurement is running. Else a message box is print.
Clicking
the close x right besides the title
bar will quit the program in any case. You should use it only an an emergency
case, as data may be lost and the program may not be shutdown safely.
Remarks
Windows versions
measure.exe
is a program for Windows XP, but should run in newer Windows versions, too. I
use it in Windows 8 without problems. However, when I tested it using the
compatibility mode Windows XP SP 3,
the program run, but failed to write data to a RAM-drive that was created with
the tool ImDisk.
CPU usage
If you run
the program using the streaming mode,
you will find that the program uses one CPU completely (100%). This is caused
by UsbDrDaq.dll of picotech and I cannot change this behavior.
If you have
a computer with more than 1 CPUs, the program will use more than 1 CPU, as it
is multithreaded. Additionally to the (mostly 2) threads within UsbDrDaq.dll
measure.exe has, besides its main thread, 2 additional threads, if you run the
streaming mode. One (with enlarged priority) collects the data and writes it
into a buffer. This needs only few CPU time. The second reads the data from the
buffer and does all calculations other actions you have specified in the
configuration file. How much CPU time is needed for this, depends on the amount
of calculations, which depends on the number of data to measure per time
interval and also on the number of calculations, which you have defined in the
configuration file for each measured value. Also, this CPU usage is much larger
for the debug version of the program as for the release version.
Streaming
with full velocity and online calculations are possible only with the release
version running on a modern PC with at least 2 CPUs.
If you
store the data to file, this may, firstly, block the program, if the writing
velocity to the disk as slower than the data rate produced by the program.
Secondly, the program can be hindered by high access times to the disk. Both
problems can be solved by writing data to a RAM drive. (ImDisk is a free and
stable tool for all Windows versions.) The data is written to file using a TAB
separated text format. This needs a lot of space on the disk, but makes the
data insertion into Excel or similar programs very easy. Therefore I store the
big files on a RAM drive and save a zipped version on the hard drive, if I do
not want to loose the data. The size of the zipped file is less than 10% of the
original file.
CheckRD
CheckRD.exe
is a helper program for Windows (XP and later, 32 bit, you do not need any
DLL’s, as it is linked static) that works only with raw data files. It can
analyze some aspects of the collected raw data. After starting the program
without parameters it will print the usage instructions.
How
to Use
Test single channel
The purpose
of this measurement is to test how fast the function UsbDrDaqGetSingle of
UsbDrDaq.DLL works. After clicking the button Test single channel the program fetches single values with maximum
speed with only three parameters as input:
1.
The
measurement is performed for the first channel checkbox that is selected. If
none is selected, channel 1 (External 1) is used.
2.
Duration
[seconds]: This tells, how long the measurement should last.
3.
Max.
delay [microseconds]: The measurement counts how many of the function calls
need more this time, and how many less. A message box will show the result when
the measurement is finished. It looks like this:
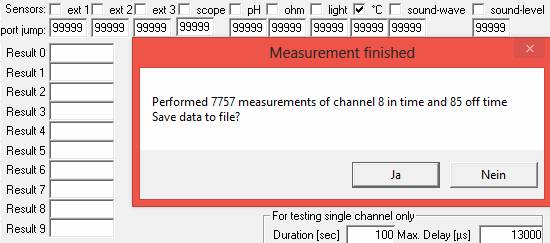
Also, this
message box asks you whether you want to save the data. If you click yes, data is appended to the file Measure_single_test.txt. The timestamp
(column 1) is the number of seconds between starting the measurement and
starting the function to get a single measurement value (column 2).
This test
method is not multithreaded. Therefore you cannot use the dialog windows as
long the measurement is running!
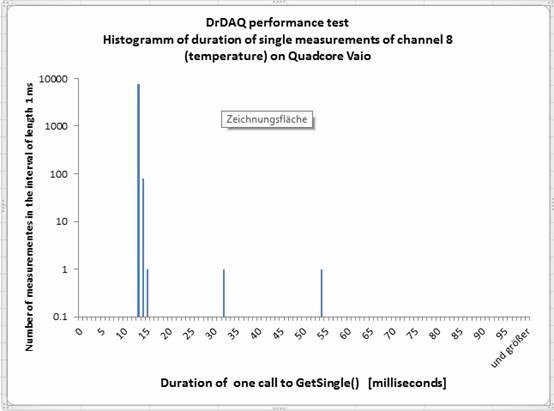
The
following picture shows a typical result. Most measurements need between 12.5
and 15 milliseconds. But a few need more than 50 milliseconds. Probably this is
caused by interrupts of the Windows 8 operating system. This shows, that a time
resolution of about 100 milliseconds is possible with the function
UsbDrDaqGetSingle. For a better resolution the streaming function must be used.
The result is very similar for all channels which I have tested: Ext1, Ext2,
Ext3, scope, light, temperature, sound wave, sound level. The external channels show a small, but
significant number of measurements with duration of 16 and 17 milliseconds and
the average duration is 12.785 compared to 12.755 for the other channels. The
minimum duration for all channels was 12.300 milliseconds, the maximum 66 ms.
Get all channels
Purpose:
Read all channels and print values to screen and file with a period larger than
100 ms.
This
measurement uses as input:
The
parameters are described in the chapter for streaming measurements.
After
clicking the button Get all channels
the program reads all channels (using the slow function UsbDrDaqGetSingle) with
the specified period. (The program uses a minimum periods of 100 ms.) The
result is displayed in the message listbox always, but writing to file depends
on your settings in the dialog window.
This
function is good for:
1.
Quickly
checking actual values of all ports, e.g. for testing a proper connection of
the devices before starting a stream.
2.
Long
duration measurements with adjustable period. (No alarm function is
implemented.)
Start stream
Purpose:
Collect and analyze data with a rate up to 100,000 per second.
Configuration file
Usually,
for streaming you will start the program with a configuration file as the first
and only command line parameter. You can do this by dragging the configuration
file and dropping it onto the program file measure.exe.
The name of
the configuration file is free. It is a simple text file which can be modified
using any text editor. It is NOT possible to save the configuration of the
dialog to a file, as there are many entries in the file which are not shown in
the dialog. Some entries of the file match the input parameters of the dialog
and will be entered into the dialog when starting the program.
The meaning
of the entries in the file is described in the sample file. Besides some common
entries you can define channels for either measuring (input channels of the
device) or just for calculations using the values of other channels.
Result files
Depending
on the settings within the configuration file the results will be saved
completely or partially to files. Using the maximum speed, I saw files
increasing to 1 GB within 1 hour. Data is saved in text format, separated by
TAB characters. So you can easily copy data to Excel or other programs for
analyzing. The disadvantage of the text format is the big file size. You may
consider to store the files using a zip program.
If you have
a slow disk, it may disable the measurements, if data cannot be written as
quick as they are produced. Using a RAM disk (e.g. ImDisk is free and good.)
can solve this problem. A good method may be first to store the data to the RAM
disk and to save it as a compressed file to a HDD after the measurement.
The result
files which are defined in the configuration file are flushed after writing
each line. This ensures that you have valid data even if the program crashes.
The disadvantage is, that this method is not the best for HDDs, as this
flushing needs time. For RAM disks, this does not matter. (The raw data files
are opened at measurement start and closed when stopping the measurement. Here
it is possible to loose data in case of program crashes.)
If the size
of the result files which are defined in the configuration file exceeds 2e9
Bytes after writing one data block, it is renamed by appending the actual date
and time to the filename. This avoids errors with files becoming too big.
The dialog window
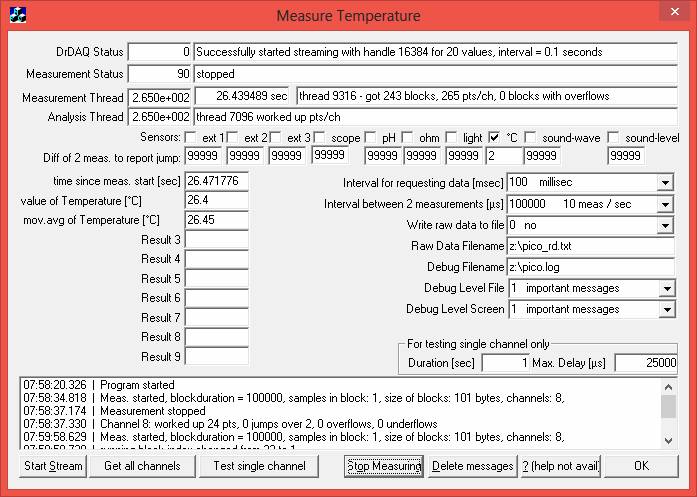
The title
bar shows the string specified in the configuration file. The same is valid for
the checkboxes of the channels, the jump values below the checkboxes, the data
request interval and the interval between 2 measurements.
Line 1 (DrDAQ
Status) shows the status of the device, the first field is the status
value, which is 0, if everything works well. The second field displays a
message with some more information about the device.
Line 2
contains the measurement status as number and text.
Line 3
shows the progress of the measurement thread, that collects the data from
the device. The first field shows the number of data points got so far. The
second field shows the time since starting the measurement (only for
streaming). The third field shows a text message.
Line 4
shows the progress of the analysis thread, which works up the collected
data. The first field shows the number of data points worked up. You can
compare this number with that of a line above to see, whether your computer is
able to work up data in time. If there is an increasing delay you need a faster
computer or you must reduce the measurement rate or the number of calculation
channels.
Line 5
contains a checkbox for each channel. If the channel is set to measure in
the configuration file, the checkbox will be selected when loading the
configuration file. You can manually change the entries, but if you unselect a
checkbox which is needed for any calculation channel, the result is
unpredictable.
Line 6
contains a field for the jump value for each channel. If
defined in the configuration file, it is set to this value, else it is 99999
and no jumps are reported as the measured values range from -32768 to 32676.
During streaming measurements a jump is reported, if the absolute difference
between two consecutive values is larger than the jump value. (To see the
message you must set the debug level to at least 2.)
On the left
side below line 6 are 10 fields for the results. The first
shows the time since starting the measurement. If the thread for working up the
measured data is late, this time differs from the time at which the displayed
data had been measured! 9 other fields are filled as specified in the
configuration file.
The right
side shows parameters for the measurement and for the output:
- Interval for requesting data: How often does the program
request new data. If this interval is large, the program will request few
big data blocks. If it is smaller, the program will request more and
smaller data blocks. Usually a value of 100 ms is good. If the program
must detect alarms very fast, you may choose a lower value. But remember
that a Windows computer is never able to react in real time.
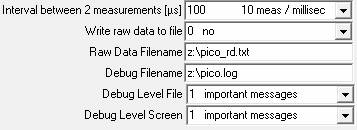
- Interval between 2 measurements: Specifies how often each
selected channel is measured. The product of the inverse value
(measurements per seconds) and the number of channels should be a divisor
of 100000. If this is not the case, the software of the device will modify
the values to its necessities. You will see it in the first line. Sample
1: Measuring 5 channels with an interval of 50 μs is OK.
- Write raw data to file: Here you can select, which
raw data are written to the file specified below. The raw data are data
which have not been modified by any calculations. For the measurement mode
Get all channels, this is the
only way to save the measured data. For streaming data you can specify in
the configuration file in detail which data is to be saved. Saving raw
data by this listbox is possible, additionally.
- Debug Level File / Screen: Here you can select, which
messages are printed to the log file (line above) and to the dialog
message list. A detailed level may produce many data and can make the
program working slow, but it may be useful for finding errors.
- Duration and Max. Delay are used
only the measurements of type Test
single channel. (See above.)
Below the
results and parameters there is the message list. New messages are
appended at the bottom. You might not see the most recent messages, as there is
no automatic scrolling. So you are able to read all messages one after the
other by scrolling yourself. Only when running Get all channels there is automatic scrolling to show you always
the most recent values. If the list contains more than 10000 entries, it is
emptied.
At the
bottom of the dialog you can find following buttons:
- Start stream: To start a streaming
measurement.
- Get all channels: Start this type of
measurement.
- Test single channel: Start the test measurement.
- Stop measuring: Stops streaming and reading
all channels. The test measurements stops itself (see duration).
- Delete messages: Removes all messages from the
message list.
- ?: Help is not available. Instead read
this manual!
-
OK: Quit
the program. Before quitting you should stop the measurement. Else you could
have troubles to start a new one.
Exclusion
of liability
The user of
the programs is alone responsible for the outcome, I herewith deny any
liability of my person or company! These macros can contain programming errors.
Principally, the programs may display wrong results and even damage your
computer or connected devices.
DISCLAIMER
OF WARRANTY.
THE
SOFTWARE IS PROVIDED AS IS WITHOUT WARRANTY OF ANY KIND. TO THE MAXIMUM EXTENT
PERMITTED BY APPLICABLE LAW, EDV ABMAYR FURTHER DISCLAIMS ALL WARRANTIES,
INCLUDING WITHOUT LIMITATION ANY IMPLIED WARRANTIES OF MERCHANTABILITY, FITNESS
FOR A PARTICULAR PURPOSE, AND NONINFRINGEMENT. THE ENTIRE RISK ARISING OUT OF
THE USE OR PERFORMANCE OF THE PRODUCT AND DOCUMENTATION REMAINS WITH RECIPIENT.
TO THE MAXIMUM EXTENT PERMITTED BY APPLICABLE LAW, IN NO EVENT SHALL EDV ABMAYR
BE LIABLE FOR ANY CONSEQUENTIAL, INCIDENTAL, DIRECT, INDIRECT, SPECIAL,
PUNITIVE, OR OTHER DAMAGES WHATSOEVER (INCLUDING, WITHOUT LIMITATION, DAMAGES FOR
LOSS OF BUSINESS PROFITS, BUSINESS INTERRUPTION, LOSS OF BUSINESS INFORMATION,
OR OTHER PECUNIARY LOSS) ARISING OUT OF THIS AGREEMENT OR THE USE OF OR
INABILITY TO USE THE PRODUCT, EVEN IF EDV ABMAYR HAS BEEN ADVISED OF THE
POSSIBILITY OF SUCH DAMAGES.
Copyright
These
programs may be copied, used and modified freely for private and other not
commercial purpose. You may give them or parts of them freely to others only
together with the information about the author, the exclusion of liability and
the copyright. These programs or parts of them must not be sold and they must
not be used for commercial purpose without permission of the author. For this
you need a license (contact)
after testing the programs for your purpose for a maximum of 2 weeks.
Support
Please
understand that I cannot give free support for a free program. If you need help
or improvements of the program contact me and tell me
you wishes to get an offer for my help.
First
published: July 13th, 2013
Last
change: July 16th, 2013
Responsible:
www.edv-abmayr.de